Cautious spring color

spring color_darning

I’ll admit to feeling some winter funk lately, after a few fleeting warm and sunny days and a return to grey. I’m craving color, cheer, change — signs of life.

(It’s snowing again as I write this).

I funneled some of my restless spring energy into a Pinterest board, a holding space for all things bright, bare ankled, and smock-pocketed.

But I’ve found another outlet: imbuing the last of my winter projects with a bit of spring fever, creating my own vibrancy until the landscape gives way. It started when I finished my big winter knitting project, the Exeter cardigan, and even worked through a few smaller gift items. Finally, restless fingers found time to pick up a holey hand-me-down cashmere sweater, fumbling my way through some experiments in darning.

Inspired equally by the visible mending movement and the shabby slouchiness of a sweater past its prime, I decided to accentuate the darning with contrasting thread colors from my collection of vintage spools.

It takes a closer eye and a bit more fine-tuned attention than evening knitting, but I’ve actually been really enjoying darning, turning each little hole into a tapestry. The overall effect reminds me of days spent in the painting studio, returning home with splotches of my palette in unsuspecting places, building color onto garments instead of canvas.

spring color_sock

This cheery nod spilled over into my next knitting project, a simple pair of socks I’ve been wanting to make out of some local Babydoll Southdown wool. Last summer, I dyed half of my lot in fresh indigo, so I decided to swatch in stripes. But it seemed like it was missing something, so I divided off another portion of the white yarn and made a quick dye bath of dried marigolds. The bright yellow is unexpected but exactly what I needed — sort of a, when life won’t give you daffodils, make your sunshine, kind of shade.

A sea of fresh indigo

5-2016-09-19-11-14-45

Is it obvious around here that I’m enamored with indigo blue?

You’ll find it in my yarn stash, on my cutting table, in my closet of course, in a bucket in my “studio” and this year, in my garden.

Japanese indigo, polygonum tinctorium to be exact.

Tended from wee seedlings in my sunroom (slash home office) to a patch in my landlord’s flower garden, I’ve been caring for my own little plot of blue, biding my time until the shiny green leaves begin to bruise and hint at the pigment within.

But what to do with the leaves? I sowed, composted, weeded, watered, and looked on adoringly while not entirely sure what I would do when it came time to harvest. Mostly because I wasn’t sure how much would crop up, and what method would be feasible.

See, I’m trying to avoid synthetic chemical intervention. Indigo is a peculiar natural dye, requiring the removal of oxygen before the color can bind to any material. This makes it magical, in a way, because when you pull something from an indigo vat you witness the pigment’s reaction with oxygen, changing from green to blue in midair.

A lot of recipes take natural indigo and add a reducing agent, called Thiox or Spectralite or, in a pinch, Rit Color Run Remover. To avoid this additive, there are a host of more-involved processes that involve fermenting the fresh leaves and feeding the vat things that will give it sugar and things that will raise the pH.

But these things are at once precise and imperfect, never a guarantee that you’ll get color at the end of your days brewing and calibrating — best done with an experienced eye.

At least that’s my take. So while I’m figuring out if and how to go the fermentation route with my backyard harvest, I decided to try dyeing with just one simple ingredient: ice water.

1-2016-09-19-11-01-30

I’d heard a rumor about this method a few years ago, and mentally bookmarked The Dogwood Dyer’s tutorial when I later came across it. Indigo expert (in my opinion) Rowland Ricketts has a few notes on it, and plant palette artist Sash Duerr raves about the resulting colors.

I trust these incredible people, so I gave it a try. And it’s really very simple, but you need a stretch of uninterrupted time and, if you’re like me, you need to put out extra rags and buckets because it’s always going to get a little messier than anticipated.

Simply put: harvest your mature indigo, cutting off the stalks (leaving room for regrowth if your season allows), then remove the leaves, blend them with ice water, strain that and use it as your dye bath.

2-2016-09-19-11-01-55

Specifics from a Saturday afternoon:

  • Prepare material by submerging in room temperature water for at least an hour. I chose skeins of yarn including local wool, secondhand wool blend (I think), and secondhand silk, all of which had been scoured previously, and the secondhand materials had been mordanted with alum.
  • Weight of goods: 625 g all together
  • Weight of harvested leaves: 206 g
  • Ice water prepared by emptying all available ice cube trays into a bowl, allowing to melt at room temperature for half an hour, then filling the bowl with cold tap water.
  • Leaves were blended in batches with enough ice water to move freely.
  • Strained blended mix using a mesh sieve, but the mix was too finely blended, so switched to using cotton gauze and squeezing it through.
  • Mixture was neon green and very frothy, tiny leaf particles impossible to strain out.
  • First dip: local wool skein submerged approx. 5 min.
  • Second dip: silk skeins submerged approx. 10 min.
  • Third dip: mystery wool skeins submerged approx. 10 min.
  • Fourth dip: local wool skein again for approx. 10 min.

1-process.jpg

Each skein of yarn came out of the bath a vibrant shade of neon green, like pure chlorophyll. When I’ve used powdered indigo vats (like so), I’ve noticed the oxidation process beginning almost immediately, transitioning to teal and then toward blue. With this process, I waited 10 minutes after the first skein and it was still a solid green, so I put it in the tub of water where the undyed skeins for soaking. By the time I finished a first dip of each yarn, the early skeins were starting to edge on turquoise, but still, it was the slowest oxidation I’ve ever seen.

Once I had cleaned up, I rinsed out excess dye and then hung the skeins on my portable drying rack, an ombre of jade and bright emerald. By mid-morning the next day, the outside of each skein was dry and aqua in color, but the interior strands were still damp and holding onto green. I found a two-part article that suggests the green continues to disappear as time goes on, but that the blue tones are fairly lightfast. You can see that even in this small series of photos, the color shifts easily with the quality of light.

At first I found the persistent green frustrating – I wanted blue! But the slow transition into turquoise is a magic all its own. And the most magnificent thing, for a Saturday afternoon in my makeshift setup, is the ease: no synthetic compounds meant I could splash with abandon (or at least, give in to accidental overflow), and compost the finished bath.

4-2016-09-19-11-07-46


Capturing summer

1-2016-09-026

The seasons are so dramatically different here, the changes are less like a marker of passing time, almost a sort of temporal amnesia.

I remember in spring — May, specifically — when the lilac that climbs the fence along our driveway began to bloom. The day we first looked at this apartment, the lilac was like a row of garlands below the windows as we walked through half-empty rooms, trying to picture ourselves here. By the time we moved, it had all but disappeared, the greenery no less spectacular than the abundant leaves and shrubs of the neighborhood. When it returned, I was giddy like it was our own private fireworks display, unfurling and completely unexpected.

Even in summer’s peak humidity (and this one, oh, it was humid) I would catch hints of our former, wintry life. Brushing up against my wool coat as I reached for the bucket of indigo vat below. An incessant bug bite on my hand nagging like dry knuckles.

This isn’t about lilacs, but about remembering — bringing a little bit of summer sunshine with us into the depths of winter.

1-2016-09-25-09-38-39-2

I didn’t get a chance to plant as much of a dye garden this year as I’d hoped. I started some indigo seeds in a tray, generously gifted by a friend from California, and some weld too, which didn’t take. I kept meaning to sprinkle a pack of marigolds and coreopsis in the front yard, but I couldn’t keep up with the weeds long enough to clear space.

I’m grateful for the opportunity to tend my indigo patch, which has been low maintenance thanks to well-timed rain showers, but found myself envious of the yellow and orange blooms all around, my eyes peeled to distinguish coreopsis from black eyed susans from the car window, spot tansy on my bike rides, or catalogue all the marigolds along my running route, mentally weighing the volume of goldenrod plumes.

1-ecoprint-curtains

Picking a few here and there wouldn’t hurt, I told myself. But you can’t clear cut your neighbors’ wildflowers, even if they don’t love them like you love them. (I told myself.)

An ecoprint seemed like the perfect way to honor summer’s colors and my neighbor’s property lines.

img_9216

Several months ago I found a perfectly crisp and white cotton sheet at the thrift store, and though it’s not the drapiest fabric, I knew it would be a cost effective way to get the amount of yardage needed for the double window behind our bed.

I roughly followed the ecoprinting instructions for the Flowers at My Fingertips kit in The Modern Natural Dyer: I cut the sheet down to size, weighed it, scoured it in the washing machine, mordanted with alum acetate, and gave it a wheat bran bath dip. Then, I strolled through my neighborhood and picked a few flowers here and there in streetside planters and the edge of the community garden. I focused on plants I’d heard were good dyeing: cosmos, marigolds, goldenrod, black eyed susan, and a yellow flower that looks like a version of coreopsis.

My goal was to try to make a geometric print by plucking out petals and leaves and laying them out like mandalas. I knew the whole bundle had to fit into my dye pot, so I measured the full width of the pot and then used that to determine how to fold and layer the fabric — essentially I divided width into quarters and only placed flowers on the middle half, then folded the blank edges over to meet in the middle.

img_9202

Some tips: use freshly picked flowers, keep the material damp, and put down a tarp! It took me most of a day to lay out the flowers along the length of the fabric, since I had various errands and things to do periodically, so having the tarp underneath was important to protect the floor, and a spray bottle of water helped keep all the pieces in place.

The result is a bit of a kaleidoscope blur, swirls of yellow and orange, petals and leaves dancing across the surface. This was my first time attempting a pattern with bundle dyeing, and I love the result but I also had an ‘aha’ moment when unrolling it: to achieve a more defined pattern, you actually want to avoid repeating the same placement (for instance, the mirrored goldenrod blooms, above) and place the material in a staggered arrangement so that when you roll it up the elements will overlap very little or not at all.

Already I feel the days shortening and the quality of light shifting, but stitched into curtains and backlit by sunrise, this print lets me hold onto summer just a little bit longer.

1-2016-09-25-09-37-07

Fall style inspiration

1-fall insp

1 | 2 | 3 | 4 | 5

Layers

I know, shocking — fall inspiration & excitement over cool weather layering possibilities. After a hot and humid summer across most parts of the country, I think this is a daydream shared by many. I’m looking forward to the usual suspects in denim, linen, wool, tights, and boots, but perhaps some new proportions this fall & winter. A bit lagenlook, a bit ’90s nostalgia, a bit of exploration and play for a contemporary mix.

1-Starred Photos31

Beanies

Because I really miss wearing hats, and also just generally being wrapped in wool. I just finished knitting the bright red Diode hat (left), which was a seasonally inappropriate summer project but a satisfying travel knit and a terrific shape and fit. Coming out of storage will be my Lilian beanie (middle) and my Jul hat (right) which to be honest needs to be re-knit at a smaller gauge because I never swatched and it has grown a lot in size. For me, hand knit accessories are a great way to top off (pun intended!) a neutral outfit and wardrobe with bright colors, and it’s also much easier and less resource-intensive to dye a small item a bright hue than to tackle, say, a vibrant oversized sweater (for Diode I used madder extract, for Jul I used fresh coreopsis flowers).

avocado

Warm neutrals

My warm weather color palette skews more toward cool colors, lightwashed indigo and white. For fall, I’m looking forward to drifting back to neutrals and a bit of warmth: grays, darker blues and black, rich browns, and apparently, I’m very drawn to that peachy nude (in inspiration images 1, 2, and 5 above). At first I thought I have nothing in that color in my stash or closet, but then I remembered the bag of avocado pits in my freezer… maybe a cool weather dye project will make that happen. (My previous avocado pit and iron dye experiments shown above).

p.s. I haven’t written off the end of summer — in real life, where it’s perfect bike riding weather, or in terms of writing here — and still plan to post about my best woman dress and reflect on my summer capsule in the coming weeks.

Capsule planning as project planning

IMG_0081As makers, we can have total freedom over what clothing to create and wear. But do you ever feel like:

  • It’s a fine (and sometimes frustrating) line between fabrics, patterns, and projects you love the look of vs. fabrics, patterns, and projects you love to wear 

— and/ or —

  • There are so many good sewing projects out there, or waiting in your stash, that you can’t just pick one to start, and you end up not making anything! (decision paralysis)

These are common challenges for me, and conversations I see popping up on social media, and I think it comes back to planning. If, like me, you enjoy planning out your makes and are looking for tools and tips to help with that process and help align your projects with your stash and your style, then may I introduce you to: the Capsule planner.

I think the beauty of the planner is that the steps aren’t revolutionary — the same type of steps that you’ll see in the Wardrobe Architect series or the Into Mind workbook, but instead of months and chapters of planning, it’s super concise. (I completed it in just two short sessions, over breakfast before work). I love planning projects but I can easily get stuck daydreaming and sketching, or conversely overwhelmed by all the great pairings of stash materials + patterns + shapes I’d like to wear. This capsule planner by the blog Un-fancy provides helpful guidelines and keeps the process confined, so you can move onto wearing (and making!) your capsule. The basic steps are:

  • Define your timeline (a season, a few months, even a specific travel period)
  • Assess your climate & lifestyle needs over this timeline
  • Pick out your 8 favorite pieces for this type of weather & lifestyle, and also note what pieces you haven’t been reaching out
  • Use those lists to brainstorm what’s working for you and what’s not, in terms of color, material, fit, etc.
  • Use the above exercises to inform a color palette, shopping plan, and budget

If you’re looking for more in-depth exploration to help identify your personal style, I think a more involved planner would be really beneficial. But if you’re looking to try a capsule wardrobe, or just find some peace in planning out what to make or buy, I’d recommend this one. (it’s free!)

The thing is, whether or not you plan on “capsule-ing” your closet, you could use this guide to make your sewing, knitting, or shopping more considered, and ultimately, I think (I hope!) make your closet more satisfactory. As I went through the planner for my summer closet, I came up with a few quick tips for adapting the capsule wardrobe planner for a handmade, me-made wardrobe:

IMG_0085

Use it (re)assess your stash

Writing out some style parameters, a color palette, and “what’s working” or not working for me, immediately made me think of my stash. How well does my stash (both fabric and yarn) reflect what I want to wear, or need to wear to suit this season? I actually took swatches from my stash and scrap bin to make my color palette, and then I also wrote down some natural dyes that fit my palette so that I have options in mind for modifying things in my stash or secondhand fabrics I come across. For example, I love the vibrancy of cochineal pink, but when I look around at my favorite things to wear (and the resulting color palette), cochineal pink really doesn’t go. But the blush pink and peach of avocado pits complements my palette, which centers around un-dyed cream/white, indigo, warm browns from cutch and pomegranate, and the range of grays from tannins + iron.

Personally I’m at a point where I feel uncomfortable at the thought of my stash growing any larger. Even though I’m focused on summer sewing, the capsule planning process (and more broadly, my efforts to keep a small closet) has helped me part with some fabrics that weren’t going to see the light of the project table any time soon. If you’re looking to de-stash, this planning process could be a great place to start!

1-2016-07-04

Use it to become a better maker

I’m pretty aware of my favorite pieces of clothing and could write down my “top 8” with little hesitation. But the “never wear” section? I blanked. I changed it to “rarely wear,” since things that are truly unworn are probably sitting in the scrap pile or someone else’s closet at this point, but when I took a hard look at my closet I realized that the things I’m reaching for the least are handmade pieces from my early days of sewing. The common themes are ill fitting and poor finishing, which I realized could not only free up space in my closet but could serve as valuable feedback to become a better maker. As I sew this summer, I’m using these “rarely worn” pieces as a good reminder that I need to make muslins or double-check measurements, and not skimp on seam finishes.

IMG_0082

Use it to prioritize your projects — both new makes and mending

For sure, I still get the urge to make all the things, but as I planned my activities & special events over the next three months, it seemed like such a busy time! So I used the shopping list as an abbreviated “making list”: I know that I have to prioritize making a dress to wear in a wedding, and then I picked 3 other items to make that will fit in my capsule. Of course, I have longer term projects like my One Year One Outfit pieces and my Tamarack Jacket, but I’ll keep those moving slowly ahead when I have time, or after I finish my priority items.

The “rarely wear” section also becomes a good “at a glance” list of what to mend, alter, upcycle, or dye — which for me is a good way to keep on sewing or knitting while not going overboard on the number of items in my capsule/closet.

IMG_0087

Use it to inpsire & budget for styling your makes & building skills

For me, the “brands” and “budget” section of the capsule planner seemed almost irrelevant at first. Of course, you can list your favorite pattern designers as your go-to brands (I did), but then I realized that brands can reveal more than a shopping list — an aesthetic wishlist. So I listed some of the brands I admired and thought about some of the reasons why I like their designs: high quality natural fibers, simple and timeless shapes, the color palette, the styling — all inspiration for my summer makes. (See more on my “sewing inspiration” pin board, if you’re curious).

And since I’m committed to using my stash, I don’t need to budget for new materials, but I realized there were a few special items and experiences I wanted to add. Going through the events, travel, and activities balance for summer really helped me crystallize this list. The big one for me is that my brother is getting married (in just a few weeks!) and while I plan to make a dress for myself, I want to complete my look with a (rather overdue) hair cut and a new pair of sandals, and if there’s room in my budget then I’ll spring for a pedicure and some makeup too (I have a running wish list of non-toxic options, but would love any suggestions if you have favorites!).

With summer travel and special events, my budget is pretty full, but in the future I think the budgeting section will also be a great place to incorporate classes and skill-building. I’ve been investing in textiles classes (most recently, weaving) and natural dye books and materials for the past year, and the cost can definitely add up. But framing them in the context of the span of a season, and in lieu of shopping, could be a great aid in allocating those funds.

So those are the modifications that came to mind for using capsule planning as a vehicle for planning all my sewing, knitting and dyeing projects. Of course, it’s my first time “officially” planning a capsule wardrobe, so I’d love to know if you have experience with this type of exercise — any and all suggestions are welcome!

Closet Turned Studio

1-2016-02-21 18.01.23.jpg

In the back of my mind, when I made pros and cons lists of moving from Oakland to Minneapolis, there was a metaphorical neon sign blinking: ROOM !

As in, craft room. Perhaps not an entirely dedicated room, but room to organize my knitting supplies, keep a small stash of fabrics, and even have a little sewing surface.

The Bay Area has so many great attributes, but affordability is not one of them. The cost of living in San Francisco ranks one of the highest in the nation, and it’s quickly spreading to surrounding cities, which felt palpable even for the brief time I lived there (I have a lot of thoughts on this, but that’s for another conversation – this is about making!). In Oakland, we shared a bedroom in a 2-bedroom apartment with a roommate and a small living/dining space, where I kept my supplies on a small cart and stored my stash in part of the built-in china cabinet. We quickly realized that for the same (or potentially less) in rent, we could afford a full 2 bedroom with separate living AND dining rooms in Minneapolis. Whoa, baby.

Our apartment is on the second floor, with lots of South-facing, sunny windows and even a peek at the city skyline. Not without its quirks — the kitchen is all-pink-everything, the ceilings are painted pastel colors in most rooms (why?) — we have lived here for about 9 months and still bask in being able to live alone and have a bit more space to spread out. When we toured the apartment, the owner stopped at the top of the stairs and gestured to a small room off the landing: “this is just a hall closet, you know, for coats and storage”

before.jpg

With a window facing the street and a closet rail on one side, the room seemed a bit like a dumping ground for the previous tenants, but Jenn and I laughed that we had probably each paid quite a bit to rent a bedroom this size in Berkeley or Brooklyn. I knew immediately it would be the perfect space for my creative projects.

When we moved in, I worked part time and spent many days fixing up the apartment: fresh white paint in the bedroom, removing scuff marks from the trim, relocating unwanted items left from the previous tenants, and scouring Craigslist for furniture. The hall closet was my favorite transformation. Adjacent to the main door to the apartment, it was painted a dark lilac on the walls and ceiling to match the hallway, and full of dusty, random household objects — a TV monitor, an air conditioner, a giant tri-fold mirror on wheels, a dresser, a lamp, a door, and other odds and ends.

At first, I was so elated to just to have a little space of my own, with a door to keep out trouble-making cats, a few drawers dedicated to supplies, and ample wallspace for inspiration. I still get excited when thinking about my “studio,” as I call it, but I quickly realized that my messy maker tendencies need a bit more structure. Here’s a rundown of the transformation & organizational efforts I’ve made so far:

  • Clean & assess: paint walls and ceiling white, remove extraneous objects, and move the dresser to the back wall. Half of the closet space is outerwear storage and off-season clothes. (below: a studio is born! If only I were naturally tidy enough to keep it so sparse and neat…)

after.jpg

  • Utilize existing storage: built-in closet drawers and shelves hold fabric, books, and tools.
  • Re-think pattern storage: un-crumple pattern pieces from bursting 3-ring binder, and hang on DIY pattern hooks (copying this design, thanks to some bent wire and a 3-hole punch).
  • Re-think pattern storage, part 2: roll large/uncut patterns into tubes and stand in a corner basket. (below: before, a paper waterfall; after, functional storage).

1-closet studio tour.jpg

  • Surface design: craft a workspace using an old door and saw horses, then swap it for a desk that fits the space better.
  • Separate the stash: group fabric together on separate shelves as uncut yardage, scraps, and muslin or upcycle-able goods, and collect all yarn in a basket.

1-2016-02-21 18.03.42

  • Go vertical: install a panel of pegboard and hang the most-reached-for tools within reach (instead of accidentally hiding them under piles of fabric and paper on the ironing board).

1-2016-02-21 18.02.23

  • Spread the storage: hunt for the perfect cabinet to fit next to your workspace, to extend and declutter your surface area, and store growing collections that crowd existing shelves.

2-2016-02-21 18.02.42

It has been really fun to adapt this space slowly, responding to my frustrations and needs as they arise. For instance, I loved the large surface that the door-as-table provided, but it was too long, so I swapped it with a desk I had bought for my home office, which fits the space much better. I also really like to spread out on the floor when cutting out pattern pieces or fabric, but until I made room in the dresser for all my muslin and upcycle-able fabric, the floor ended up covered in piles of scraps and linens.

Do you ever feel like you’re constantly re-learning the same things about yourself? For me, it’s finally sinking in that I need to have very specific spots for things, or they have a strong tendency to spread out, disperse, and pile up around the house. Getting my tools out of too-full drawers and into designated spots on peg board is super exciting for this reason. No more digging around for thread and scissors! This is also how I realized that while I love the look of open storage shelving, a cabinet would be a better match to hold my dye supplies, and WIPs. After lots of fruitless Craigslist searches, I brought home a wicker storage unit last week that seems to be the perfect compromise.

My “studio” is still a work in progress, but it’s so much easier for me to organize and clean as I go, which means I can make the most out of the time I get to spend in there. Next up, I need to finally get a curtain rod for the window, and I’m looking forward to reorganizing my fabric while working through the Stash Less challenge #1.

In the meantime, I do enjoy a good before and after transformation:

1-Starred Photos


A year in stitches: One Year One Outfit Recap


1-2016-01-18 17.25.31-1.jpg

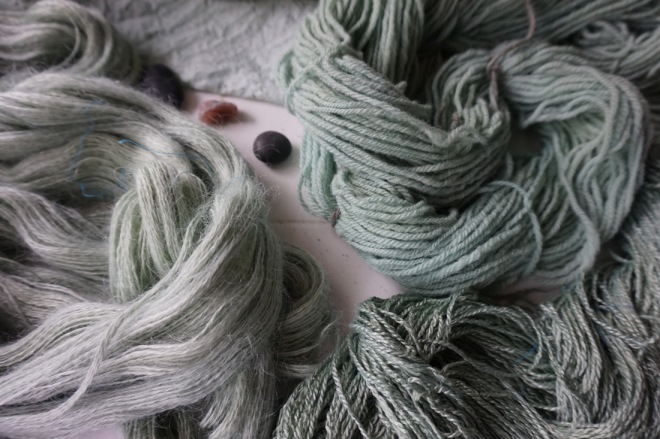
To write one summary post for all these projects hardly does justice to how much I love these pieces, how much I learned making them, and how knitting with local materials has deepened my connection to my local landscape and community. Alas, we’re nearing the end of January and it’s high time to round up what I made for my One Year One Outfit challenge. Spoiler alert: there is no true “outfit” but there are 3 sweaters, 1 shawl, and one hat, which truly reignited my love for knitting and led me to explore local fiber and local dyes, resulting in hard-working wardrobe staples.

A note: I wish I had the time or foresight to photograph these pieces outdoors, in the actual fibershed environment, but at the time I was able to shoot them, the day’s high was 1 measly degree (F), so here I am in my sunroom. I modeled each of my local fiber garments over my favorite and very special dress, which is not hyper-local, but it is made of organic cotton fabric grown by Sally Fox, milled and woven in Japan nearly two decades ago. The fabric was imported last year by Kristine of A Verb for Keeping Warm in collaboration with Sally Fox, and the pattern is the Prism dress also by A Verb for Keeping Warm, with the in-line pocket addition I wrote about here. I told a bit more of this dress’s story on Instagram during Slow Fashion October, and it seemed fitting to wear it as the foundation for my local knitwear.

And now, a lightning tour of 2015!

January

1-2016-01-18 16.59.19

2-1Year1Outfit7

Garment: my first sweater!
Fibershed: Northern California
Pattern: Hayward by Julie Hoover for Brooklyn Tweed. Mods noted on Ravelry.
Fiber: Twirling Petals yarn in Earl Grey, Drunken Ollie in Eucalyptus, Indigo on Muffy
Farmer: Mary Pettis-Sarley (photo below via Tolt Yarn & Wool)

Twirl by ToltNotes: This sweater reignited my love for knitting. I learned to knit about 10 years ago, made a few small accessories, and drifted away from knitting during college. In 2014 I lost my favorite hand knit cowl and sought a creative outlet from my job, which was nearly equal parts very stressful and very rewarding. So in the fall of 2014, after meeting Rebecca Burgess and getting to know the Fibershed community, inspiration overcame intimidation and I decided to knit my first full sweater. I decided to look for a Brooklyn Tweed pattern with a low difficulty rating, because I liked the contemporary designs and heard that the instructions were detailed. I settled on this simple pullover, and searched for a local yarn alternative to Loft. I heard great things about Twirl, and loved the whimsy of the logo and the yarn names, so I took a day trip to Knitterly in Petaluma and spent a long time looking at color combinations. There wasn’t quite enough of any one color that I liked, so I decided to color block the pieces. Around this time, I had been living on a very small budget and had mostly bought secondhand clothing for the past few years, so saving up for and purchasing a sweater’s worth of yarn felt like a big investment – it was probably the most I had spent on any one item in at least five years. It was so rewarding to spend those savings in support of local businesses run by inspiring women. Yarn in hand, I started my sweater. I knit in the mornings before work, I knit on BART, I knit some days on my lunch break on a patio full of business people, and I knit a lot in the evenings after Jenn went to bed (at the time she was a baker and worked very early mornings) — I was hooked! Finishing this sweater in early 2015 felt triumphant – and exuberant! I love it to pieces and am keeping it out of rotation this winter to preserve its longevity (it’s the perfect spring/summer/fall layer).
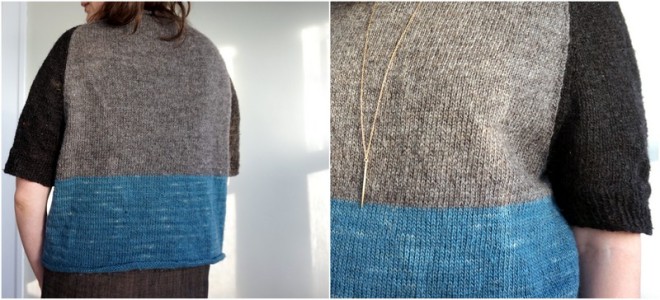
May

1-2016-01-18 16.47.25

1-1Year1Outfit8.jpg

Garment: marled Ondawa
Fibershed: Northern California
Pattern: Ondawa by Michele Wang for Brooklyn Tweed. Mods noted on Ravelry.
Fiber: Radius by Knitterly Petaluma in Alpaca/wool marl
Farmer: Mimi Luebbermann, Windrush Farm (photo below via Fibershed)

Windrush-collage6.jpg

Notes: After finishing my first sweater I was hooked on knitting once again, and really drawn to knitting this pattern, which I had tried on at the Brookyn Tweed trunk show at A Verb for Keeping Warm. In my mind I pictured it in the perfect shade of camel, but I had a hard time finding the right color, until I came across the new Radius offerings by Knitterly. I got really excited about this marled alpaca/wool blend (I think it’s basically an alpaca single plied with a wool single) and from there the knitting went much faster than I expected. This sweater is so warm and soft, and practically a security blanket for me. I love the cream color and the way the busy cables and subtle marl interact, and I just wish it wouldn’t pill quite so much (the downside of very soft fibers and a lightly spun yarn), but I can’t see myself stopping wearing it any time soon.

October

1-1Year1Outfit4

Garment: Pure transition shawl
Fibershed: Northern California & Twin Cities
Pattern: Pure by cabinfour. Mods noted on Ravelry.
Fiber: Radius by Knitterly Petaluma in Alpaca/wool blend; local merino by Rach-Al-Paca Fiber Mill
Farmer: Various; Photo below of Rach-Al-Paca Mill in Hastings, Minnesota

DSC00138

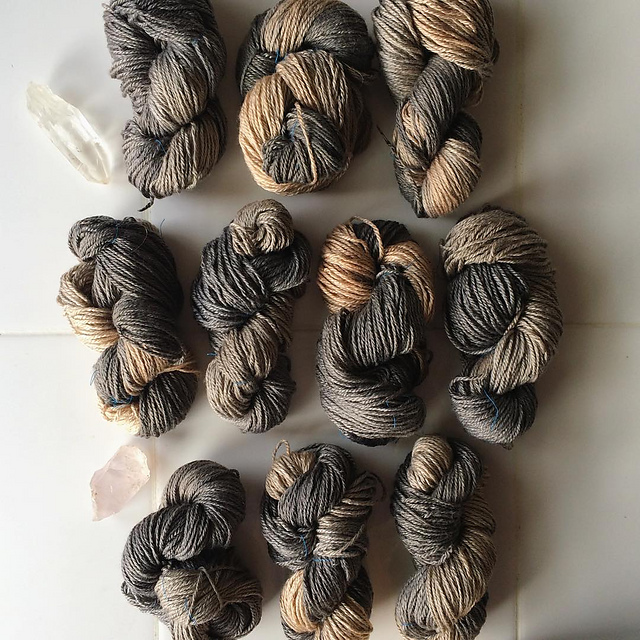
Notes: I knit this shawl as the temperatures shifted from mild to cold, and the dry fall air lent an urgency to the changing seasons. My grandmother passed away, not unexpectedly, and I spent two days wrapped in my favorite afghan that she knit, watching this shawl take shape, melding the places I’ve recently called home. The lighter, silvery-brown is a blended yarn from the Radius yarn that was actually sent to me by mistake when I needed an extra skein for my Ondawa sweater. I used the stitch pattern sections as my guide for alternating the yarn with a naturally-colored, chocolate brown Merino raised by a small farmer who lives right down the road from Rach-Al-Paca Fiber Mill, where I purchased the yarn. The color is rich and the yarn is squishy but hearty. This shawl is might just be my signature winter accessory, and I wear it almost every day, usually wrapped around my neck as a giant kerchief. It makes an excellent barricade against sub-zero wind chill.

November

1-2016-01-18 16.44.04

1-1Year1Outfit9

Garment: flockalong cardigan
Fibershed: Northern California
Pattern: Liv Light by Carrie Bostick Hoge. Mods noted on Ravelry.
Fiber: Flock, 1st Edition by A Verb for Keeping Warm, in granite
Farmer: Various; learn all about how Flock was made here (photo below via AVFKW)

Flock in transit.jpeg

Notes: I actually knit this sweater after moving to Minnesota, when I probably should have focused on a Minnesota fiber project. Instead, I became totally smitten with the gorgeous yarn created by Kristine and the team at A Verb for Keeping Warm. I have no regrets. It took me a very long time to knit this fingering-weight cardigan, but I love the simplicity of the top-down pattern and the way the yarn changed from white to cream to shades of gray. The color variations are natural and due to the way distinct fiber (Cormo, Corriedale, and Targhee) from three different flocks was blended while spinning. I actually had the opportunity to tour Green Mountain Spinnery, where Flock was spun, while visiting friends on the east coast this summer, and it was magical. Peeking behind the scenes at the spinning process added another element of depth to this knitting project, and I think this yarn is a great example of how to incorporate different fiber properties and embrace the diversity of local sheep breeds.

December

1-1Year1Outfit5.jpg

coreopsis.JPG

Garment: coreopsis Jul
Fibershed: Twin Cities
Pattern: Jul hat by Wiksten. Notes coming to Ravelry soon.
Fiber: Alpaca/merino blend by Rach-Al-Paca Farm and Fiber Mill, dyed in foraged coreopsis
Farmer: Rachel Boucher

1-DSC00134.JPG

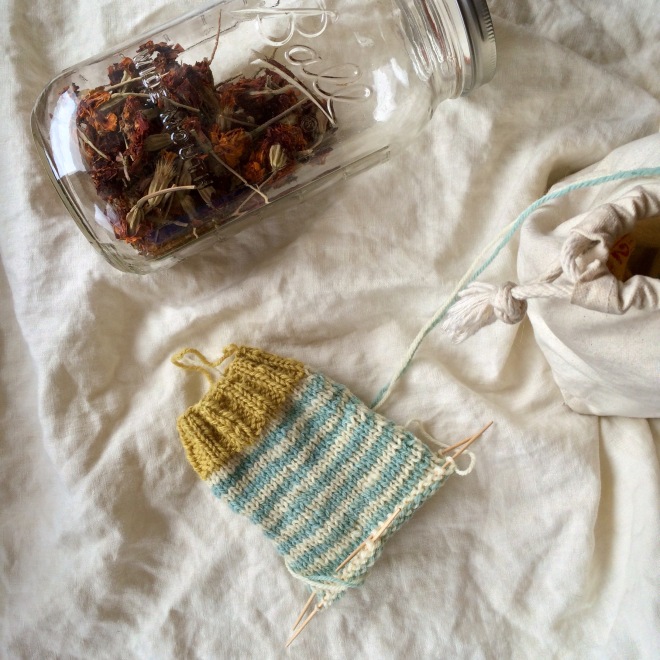
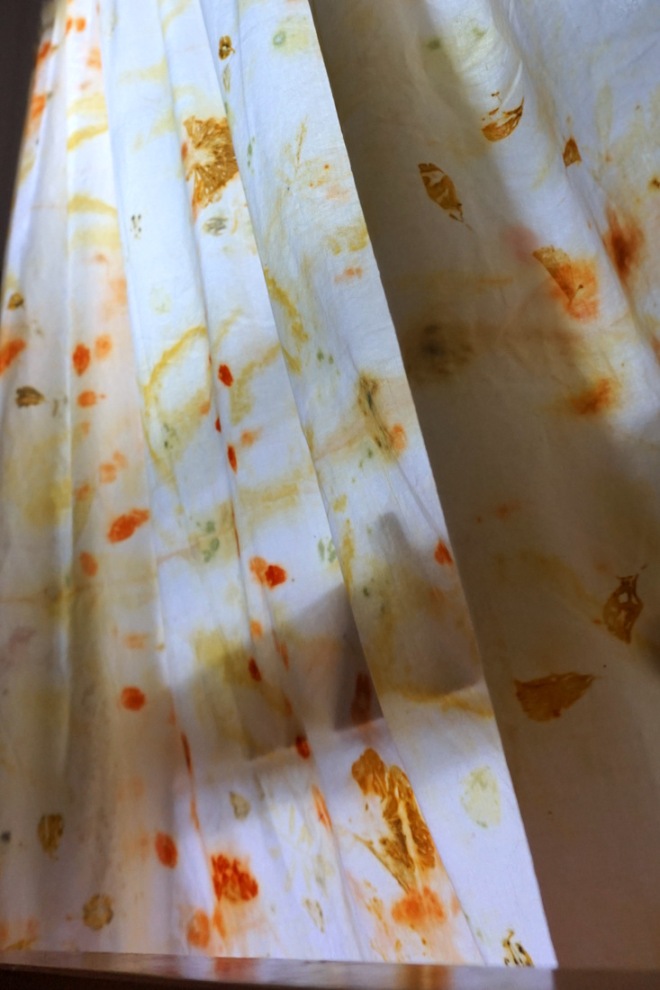
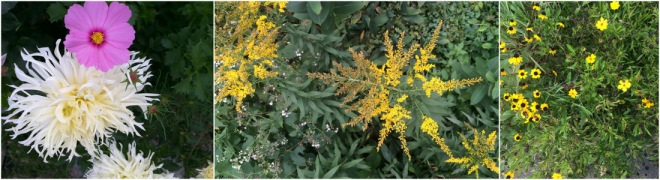
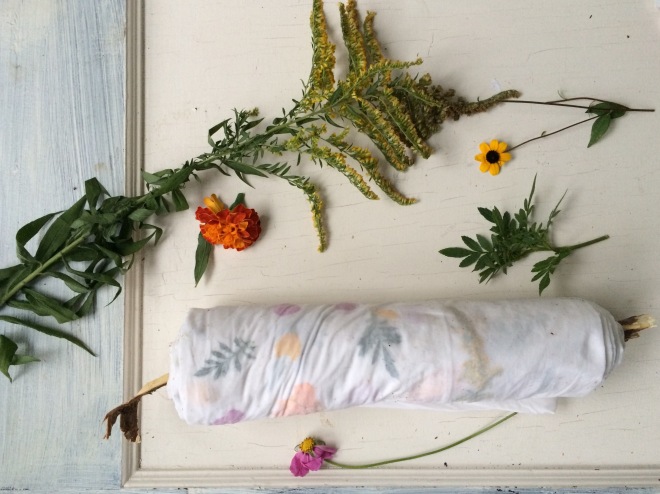
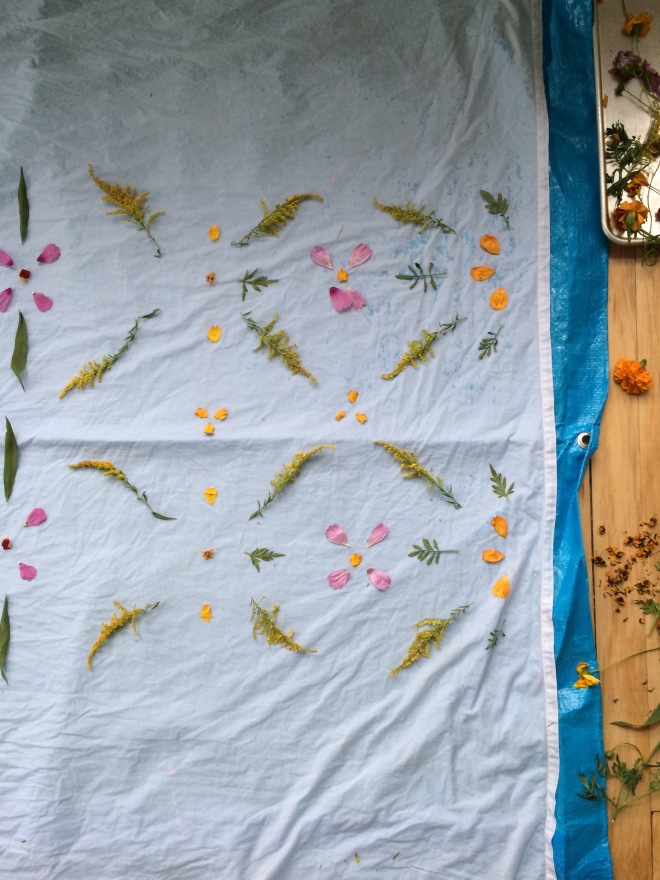
Notes: I started working from home this summer, and have found it both freeing and overwhelming. I find it important to take breaks and get outside every day, and one day on the cusp of early fall, I rode my bike up a local trail, searching for dyestuffs. I found neither black walnuts nor pokeberry (as I had hoped), but a patch of wildflowers in the parking lot of an office complex caught my eye. I pulled over, and immediately recognized the yellow flowers with blood red centers as dyers’ coreopsis. I harvested quickly and tried to explain to a confused receptionist exactly why I was loitering in the parking lot (note to foragers: go after work hours). I created a solar dye bath and took a chance on dyeing a whole skein of yarn (about twice the weight of the dyestuff). The resulting golden color made a cheerful hat that is slouchy, warm, and super soft thanks to the alpaca. The fiber was raised in Minnesota and milled in Hastings, Minnesota by Rachel Boucher, a passionate and prolific farmer and small business owner.


& in case you’re wondering what the full “outfit” looks like…1-2016-01-18 17.12.06


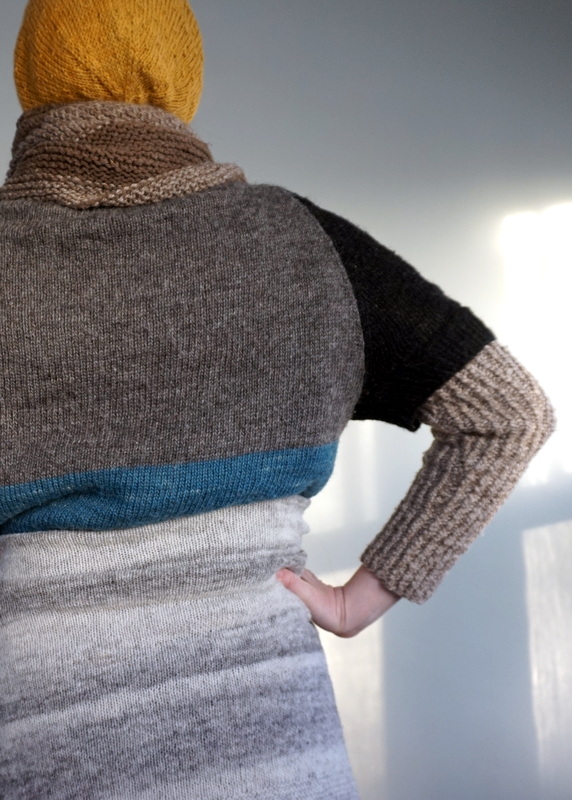
End note: Here is where I should tell you that I contribute to Fibershed’s non-profit educational/advocacy work with research, communications, program support, and general operations. It has been a joyful and exciting journey to get involved with the organization, and I’m thrilled to support its mission and vision. These knits, and this blog in general, are my personal projects and all opinions stated here are my own. I love taking part in the One Year One Outfit challenge — which I am personally extending into a 2 Years 1 Outfit challenge (wink) — and I think Nicki  is doing a tremendous job energizing people around the world with the One Year One Outfit challenge to explore what it means to dress locally. I just want to be completely honest about my bias in support of this project and Fibershed in general, since I am sort of wearing two hats as a staff member and affiliate member — two hats that are locally grown, naturally dyed, and locally made, whenever possible!


Indigo Tamarack: Part I

DSC00456 - croppedIMG_5962

A number of drafted blog posts have fallen by the wayside around here, and I hope to return to them in the early new year, but I’ve found that it’s easiest and most satisfying to post about my active projects, so I’m leaping out of chronology to talk about what’s on my work table now: a Tamarack Jacket.

Tamarack Dreams

I’m a big fan of Grainline Studio, from the pattern designs to Jen’s blog styling. The contemporary aesthetic and thorough instructions have played a huge role in my re-discovery and enjoyment of sewing in the last few years. That said, when Jen started hinting on Instagram that a quilted jacket pattern was in the works, I thought it looked great but was not something I would make — it looked laborious and I wasn’t sure if it fit my style. Yet by the time Grainline Studio released the Tamarack Jacket, temps here in Minnesota had dropped to the mid-40s and I had realized that my outerwear options were severely limited.

On the spectrum of warmth, between my Uptown jacket and a very heavy wool coat (one of my favorite thrifting scores), I was left with a 3/4-sleeves jean jacket and a zip-up fleece jacket I’ve held onto since age 12 and usually reserve for sporty activities. Suddenly, a Tamarack Jacket seemed absolutely essential for my daily life and wardrobe. I bought the pattern immediately.

One of the outcomes of participating in Slow Fashion October has been a growing awareness that I have enough. In fact, I have plenty. I have an abundance of beautiful yarn, fabric, garments to upcycle, dye project materials, etc.  Since time is my limiting factor, I’ve gathered a plentiful stash which I am excited to work with, but very wary of growing.

Turning to my stash, I quickly decided that two yards of this Organic, U.S.A. grown and made chambray would be perfect for my Tamarack. Purchased back in the summer with an Archer in mind, the chambray is colorgrown cotton, which is bred to produce natural pigments instead of plain white boules. The green color is very faint, with a silvery tone to it,  and while it’s really lovely, it unfortunately looked terrible on my skin tone.

Indigo to the Rescue

Last year, my wonderfully thoughtful partner, Jenn, gifted me an indigo shibori kit from Botanical Colors. For nearly a year I have treasured this kit — so much so that no project seemed worthy of its use. With the end of fall fast approaching, I seized the opportunity to finally make the indigo vat, with visions of a rich blue Tamarack dancing in my head.

The kit includes everything needed to create an organic indigo vat, or fruit vat, as designed by French chemist Michel Garcia. I followed the instructions provided by the kit, and cross-referenced The Modern Natural Dyer and this guide from Maiwa.

Though I’ve dyed with indigo before, I had never created my own vat, and I have to say it’s truly a magical process. If you’re not familiar, natural indigo requires a reduction process to make the dye available to fibers, meaning you have to remove the oxygen from the vat. Though blue on the surface, a reduced indigo vat is yellow-green, and fabric pulled from the vat is green at first, then turns blue as it is exposed to oxygen. An organic vat can be made in several ways (see the Maiwa guide for more), but the fruit vat uses fructose to reduce the indigo, and slaked lime (calcium hydroxide) to raise the pH (i.e. make it basic).

I decided to dye on an unseasonably warm weekend, knowing it would be one my last chances to be outside in 60 degree weather for many months. I prepared the mother in a large glass jar (above photos), let it rest and reduce, then created the vat in a 5 gallon bucket. Outside, I set up a clothesline and brought out 2 extra buckets filled with some water for oxidizing and rinsing the fabric.

DSC00457

While planning out the project, I was concerned that the kit would not be strong enough to get at least a medium shade of blue on all the fabric for my Tamarack. My 2 yards of colorgrown cotton were not quite enough to supply all the lining and exterior pieces, so I decided to use the largest scraps of similar-weight cotton from my stash for the remaining lining pieces. I didn’t want the jacket to look too hodge-podge, but I figured the indigo would be the great equalizer. So, after printing and assembling the pattern, I cut 2 of each piece from the various fabrics (back, fronts, sleeves, pocket).

All sources I’ve read say that you’ll get the strongest blues at the beginning of using your vat, so I started dyeing with my Tamarack Jacket pieces first to ensure a relative even color. I submerged each piece in the indigo for 4 minutes, moving the fabric through the vat gently to get an even color without adding oxygen to the vat. I hung each piece on the clothesline to oxidize (see below), and continued for additional dips to build the color gradually. Ultimately, I did two dips for the lining pieces and three dips for the exterior of the jacket. Once I felt satisfied with the shade of the Tamarack pieces, I continued dyeing other scraps and yardage from my stash; at the top of the post you can see the “before and after” piles and colors of fabric. After several hours playing the my indigo vat, the sun had set and I could tell the vat needed to be recalibrated (it had lost the bloom and coppery sheen on top, was cool in temperature, and producing very light colors).

DSC00469

Here are some of my indigo dyeing takeaways:

  1. Indigo is very temperature sensitive, and I found that the indigo mother reduced very slowly until I put it in a hot water bath and closely monitored the temperature. Once the temperature was steadily kept between 110 and 120 degrees (F), the indigo sedimentation fell steadily to the bottom of the jar and the navy blue bloom with coppery scum grew at the mouth. This is what you need to look for to know that the mother is ready.
  2. You probably don’t need to use the whole kit in one go. The kit says it contains enough indigo to dye 6 T-shirts to a medium shade. It doesn’t provide the weight of 6 T-shirts but I figured between the Tamarack pieces and other items I wanted to dye in my stash, I would exhaust the whole kit. In hindsight, I would recommend starting with half the ingredients in the kit, that way you have some fructose and lime leftover to help recalibrate the vat, and some additional indigo to create a new mother and reinvigorate it.
  3. You can reuse an organic indigo vat! The instructions from Botanical Colors don’t seem to mention this, but both the Modern Natural Dyer and Maiwa suggest that the vat can be saved and brought back to life. After drying all of my dyed pieces, I realized that the front pieces of the Tamarack pattern had a streaky effect where the dye washed out unevenly. I was disappointed, but then realized I could bring the vat back to strength and overdye them to hide the mistake. I followed the helpful guidance from Catherine Ellis’ blog and simply added fructose and made sure that my vat stayed between 110 and 120 (on the stovetop). It smelled like maple syrup and though the vat didn’t last as long, I concealed the streaks with 2 more dips per piece of the jacket.

I’m quite excited to begin quilting my Tamarack Jacket, though I’m nervous because I’ve never really quilted anything. I’m also a little nervous that repeated dyeing and washing may have shrunk my pieces or caused too much fraying in the seam allowance. What if I make the whole jacket up and it’s too small? It may have been wiser to dye the fabric instead of the pre-cut pieces. But I’m forging ahead with test quilting and basting my “quilt sandwich.” On my next post, I’ll write about my thought process and research into sourcing quilt batting.

DSC00493