Indigo tamarack: part IV

Indigo Tamarack 1.jpg

All the while making this jacket, I thought to myself: this will either look crazy, or crazy good.

As I rounded the home stretch of binding the jacket edges, I knew that the latter was confirmed. Introducing my indigo Tamarack jacket: hand-dyed, patchwork-pieced, hand-quilted, lined in upcycled flannel, filled with locally made wool batting, bound by hand, a supremely cozy feat of skill-building slow fashion.

Indigo Tamarack 3.jpg

It just feels so good — crazy good — to finally wear something that has been growing and evolving, stretching and reflecting over a year of creativity. In a way, this jacket charts my trajectory in style and skill, explorations and impulses. In a way, it’s less a statement jacket and more a summary.

In nearly any incarnation, the Tamarack Jacket pattern by Grainline Studio seems like the perfect transition-season outerwear. For mine, I lengthened the body by 1″ and the sleeves by 2″, my standard adjustments, and the fit is perfect for lightweight layering. It’s a little crowded with my Exeter cardigan underneath, but just right over a fingering-weight sweater or simple sweatshirt (may I suggest: Liv light or Linden). It doesn’t yet have any form of closure, though I plan to add a few hooks & eyes, which I’m waiting to see if I can find at a textile recycling event later this month, and the updated version of the pattern includes a delightful looking snap option.

Indigo Tamarack 4.jpg

Should you choose to make a Tamarack Jacket in pre-quilted fabric, or perhaps a vintage quilt (yes, please do that!), you could probably have one in a day. Should you go for custom machine-quilting, you can probably still finish it in a weekend. Should you wish to make an indigo vat, cut apart and patchwork together your pieces, source your batting locally, quilt it together with sashiko thread, bind all the interior seams, finish the exterior binding by hand, and embroider your heart into painstaking welt pockets — well, it might just take you a year and a half.

And it might be a crazy-neverending WIP, but the payoff might just match the persistence.

Indigo Tamarack 2.jpg

Worn with: vintage silk tee & jeans, handmade shawl, favorite necklace & clogs.

A sea of fresh indigo

5-2016-09-19-11-14-45

Is it obvious around here that I’m enamored with indigo blue?

You’ll find it in my yarn stash, on my cutting table, in my closet of course, in a bucket in my “studio” and this year, in my garden.

Japanese indigo, polygonum tinctorium to be exact.

Tended from wee seedlings in my sunroom (slash home office) to a patch in my landlord’s flower garden, I’ve been caring for my own little plot of blue, biding my time until the shiny green leaves begin to bruise and hint at the pigment within.

But what to do with the leaves? I sowed, composted, weeded, watered, and looked on adoringly while not entirely sure what I would do when it came time to harvest. Mostly because I wasn’t sure how much would crop up, and what method would be feasible.

See, I’m trying to avoid synthetic chemical intervention. Indigo is a peculiar natural dye, requiring the removal of oxygen before the color can bind to any material. This makes it magical, in a way, because when you pull something from an indigo vat you witness the pigment’s reaction with oxygen, changing from green to blue in midair.

A lot of recipes take natural indigo and add a reducing agent, called Thiox or Spectralite or, in a pinch, Rit Color Run Remover. To avoid this additive, there are a host of more-involved processes that involve fermenting the fresh leaves and feeding the vat things that will give it sugar and things that will raise the pH.

But these things are at once precise and imperfect, never a guarantee that you’ll get color at the end of your days brewing and calibrating — best done with an experienced eye.

At least that’s my take. So while I’m figuring out if and how to go the fermentation route with my backyard harvest, I decided to try dyeing with just one simple ingredient: ice water.

1-2016-09-19-11-01-30

I’d heard a rumor about this method a few years ago, and mentally bookmarked The Dogwood Dyer’s tutorial when I later came across it. Indigo expert (in my opinion) Rowland Ricketts has a few notes on it, and plant palette artist Sash Duerr raves about the resulting colors.

I trust these incredible people, so I gave it a try. And it’s really very simple, but you need a stretch of uninterrupted time and, if you’re like me, you need to put out extra rags and buckets because it’s always going to get a little messier than anticipated.

Simply put: harvest your mature indigo, cutting off the stalks (leaving room for regrowth if your season allows), then remove the leaves, blend them with ice water, strain that and use it as your dye bath.

2-2016-09-19-11-01-55

Specifics from a Saturday afternoon:

  • Prepare material by submerging in room temperature water for at least an hour. I chose skeins of yarn including local wool, secondhand wool blend (I think), and secondhand silk, all of which had been scoured previously, and the secondhand materials had been mordanted with alum.
  • Weight of goods: 625 g all together
  • Weight of harvested leaves: 206 g
  • Ice water prepared by emptying all available ice cube trays into a bowl, allowing to melt at room temperature for half an hour, then filling the bowl with cold tap water.
  • Leaves were blended in batches with enough ice water to move freely.
  • Strained blended mix using a mesh sieve, but the mix was too finely blended, so switched to using cotton gauze and squeezing it through.
  • Mixture was neon green and very frothy, tiny leaf particles impossible to strain out.
  • First dip: local wool skein submerged approx. 5 min.
  • Second dip: silk skeins submerged approx. 10 min.
  • Third dip: mystery wool skeins submerged approx. 10 min.
  • Fourth dip: local wool skein again for approx. 10 min.

1-process.jpg

Each skein of yarn came out of the bath a vibrant shade of neon green, like pure chlorophyll. When I’ve used powdered indigo vats (like so), I’ve noticed the oxidation process beginning almost immediately, transitioning to teal and then toward blue. With this process, I waited 10 minutes after the first skein and it was still a solid green, so I put it in the tub of water where the undyed skeins for soaking. By the time I finished a first dip of each yarn, the early skeins were starting to edge on turquoise, but still, it was the slowest oxidation I’ve ever seen.

Once I had cleaned up, I rinsed out excess dye and then hung the skeins on my portable drying rack, an ombre of jade and bright emerald. By mid-morning the next day, the outside of each skein was dry and aqua in color, but the interior strands were still damp and holding onto green. I found a two-part article that suggests the green continues to disappear as time goes on, but that the blue tones are fairly lightfast. You can see that even in this small series of photos, the color shifts easily with the quality of light.

At first I found the persistent green frustrating – I wanted blue! But the slow transition into turquoise is a magic all its own. And the most magnificent thing, for a Saturday afternoon in my makeshift setup, is the ease: no synthetic compounds meant I could splash with abandon (or at least, give in to accidental overflow), and compost the finished bath.

4-2016-09-19-11-07-46


Wabi-sabi Dress. No. 1

1-DSC01494

Do you know Sonya Philip’s 100 Acts of Sewing project & patterns? She’s one of those designers/makers who I follow on Instagram and am always eager to see what she’s up to, how she’s styling her makes (see #handmadewardrobechronicles for street style inspiration), and what else she’s discussing – like body positivity and the politics of fast fashion. Her patterns are much like her style – clean lines, comfortable shapes, and infinitely customizable, and I’ve wanted to try them for quite some time. This summer seemed like the perfect time to give Dress No. 1 a try.

As all the rave reviews indicate, Dress No. 1 is a fabulous beginner pattern – it’s just one piece! To be honest, I probably could have drafted a super similar dress on my own, but sometimes I just like supporting what someone else is up to, and I feel like she’s got the fullness of this a-line skirt juuuust right.

I, however, got the fabric for this flat wrong on the first try. It’s quite a saga but let’s just say my natural dye experiments went a little drastic and I now have some scratchy, somber dark khaki mystery fabric (a secondhand find, I suspect it’s cotton, not silk as a handmade label indicated) — suitable for a home decor project some day.

The morning after the fabric flopped (for this dress and the summer wedding I wanted to wear it to), I woke up and peered around my stash. Even though I’m on a stash detox and not buying any new fabric, I contemplated running to the thrift store to see if I could find anything usable. But that seemed like a lot of effort. And I’m trying to really embrace abundance; I have enough — plenty.

So I pulled down my box of scraps, and started laying out the more size-able pieces — you know the oddly shaped 1/4 yard or so that often results from cutting a garment? It always surprises me that there seems to be enough to make another whole (albeit, small) garment, but then I hesitate because I’m reluctant to have an overly matching wardrobe.

I couldn’t find enough of any one fabric to squeeze out the dress, and as soon as I started thinking about piecing together two fabrics, I thought if two why not four? And once I had a vision of a dress pieced in quadrants, I thought, hell, why not full patchwork?

And so my wabi-sabi patchwork dress was born.

Here’s a tip: search “patchwork dress” on Pinterest if you want to make a gypsy costume or enjoy those ’90s handkerchief-hem skirts. Search “indigo patchwork dress” if you want some more refined garment piecing inspiration:

Pin-spiration 1, 2, 3, 4

This helped me solidify my vision and get a sense of how to proportion the pieces. I immediately like the off-center approach (as in 1 and 4 above), as opposed to splitting the garment visually down the middle. So I copied the pattern piece onto tracing paper to create a whole piece (instead of the “cut on fold” original) and started laying out fabric on the floor to see what would work where. I should say I also had Felicia Semple’s patchwork dresses somewhere in my mind, and certainly her Stash Less challenge continues to inspire me.

I think it actually helped that I had a (albeit sad, brown) muslin to try on because I could see where different parts of the dress would fall. Mostly I just wanted to avoid awkward lines or cut-offs on the bust.

IMG_7421Do you ever just get in the creative flow when you stop questioning yourself and start letting your hands carry out your mind & heart’s vision? I tend to overthink things, to work very slowly, but in this case I was both running out of time and running on excitement for getting to touch and admire some of my favorite fabrics again. The large panel on the front and back is linen that I bunched up and dyed in indigo, the gingham is from my khadi Prism dress, the back strip of printed fabric is tencel from Feral Childe (used to make Hudson pants that I adore), the yoke is an indigo-overdyed scrap from my Tamarack Jacket, and there is a solid linen scrap on the back from my vintage wrap skirt. The pockets and bias binding are made of scraps too!

When I trusted my gut I found that the patchwork came together quite quickly! It helped that I used pretty large pieces, and made a very rough sketch on paper for how to balance the fabrics. There were two important things I kept in mind and prioritized – sort of my mantra for the morning: to align the grain across the fabrics as I pieced them, and to do proper French seams with a good press and trimmed seam allowance each time.

1-Starred Photos24

I knew these two factors were important because of my handmade wardrobe reflections, which I was reminded of when I went through the Un-fancy capsule planner. A few of the garments I made two years ago (when my love for making clothes began to flourish) had poor seam finishing and have worn out quickly and had to head to the scrap bin. Another top I made back then, my first patchwork garment ever, looks great on the hanger but awkward on my body because I didn’t pay attention to the grainline of each piece, and as a result the drape is really wonky (which is super noticeable because I used heavier fabrics like mid-weight denim).

While the wabi sabi dress piecing isn’t perfect (that’s why it’s wabi sabi, no?), it’s leaps & bounds above those earlier garments. Everything is finished clean on the inside, including pockets (drafted off my favorite vintage dress) and bias bound neck and arm holes. All together, it’s a scrap-busting success and so fun to twirl in.

1-2016-07-18

Have you made any patchwork clothes? What are your other favorite things to do with scraps?

Indigo Tamarack: Part III

IMG_0075

Fear not, my tamarack jacket is alive!

Remember when I bought the pattern as soon as it came out, dyed the fabric with indigo, sourced locally made wool batting, and even tested my quilting methods, then tabled it for six months and then wrote about how I really ought to prioritize it my queue?

Well it’s been the slowest of slow fashion, but the thing is, I didn’t really like how the quilting was looking. I went so far as to start machine quilting the back piece of the jacket, and though the stitches were even and I basted it and used a walking foot, the batting was so lofty and my quilting so amateur that the edges of the piece no longer aligned. I knew that if I continued I would hardly have a jacket the same size as the one I cut out.

I put my tamarack jacket in time out.

In the intervening months I had so many ideas for how to shift directions — minimalist sashiko hand quilting that would match the color of the jacket for a subtle tone-on-tone look; maximalist sashiko hand quilting that would celebrate the dashing white stitches in geometric patterns; machine quilting with narrow stripes to tamp down the loftiness; hand quilting with wide stripes to embrace the puffiness, etc. etc. as the Pin-spiration grew.

Inspiration 1, 2, 3, 4

I settled on a plan to make the quilting easier by reducing the loft of the batting by carefully “peeling” half of each piece off. To compensate for the lost insulation, I decided to switch from the lining I had cut from scraps to a lining cut from a thrifted flannel sheet. But still, I was uncertain of how to quilt the jacket.

And then, the Secret Catalog arrived and Maria’s OKONION x Secret Catalog quilts gave me ALL the heart eyes. (I know, emoji-speak, but seriously, check the quilts):

okonion quilt 1

Suddenly, all I wanted to do was quilt and all those months of Tamarack indecision evaporated as I decided I would jump into some quilt piecing. Since I had decided to remove the indigo-dyed scrap lining, I now had a set of coordinating fabric I could cut up and piece together. The last time I tried to quilt was in middle school and I chose turquoise and bright purple fat quarter sets from the local big box fabric store, and I think it was just a simple square repeat but the process lasted longer than my love for the color palette so I never finished it. (sorry mom, I still so appreciate your help).

I’m a big fan of Purl Soho’s blog, so I figured their classic aesthetic and generous tutorials wouldn’t lead me astray. The denim pinwheels pattern caught my eye quickly and seemed like a perfect match, so I trusted my gut and started cutting some test squares.

testing pinwheels

I followed the Purl Soho instructions but decided on 4″ pinwheels and adjusted the math accordingly (with 1/4″ seam allowances for the pinwheel piecing). Quilting the whole jacket seemed overly ambitious, and less wearable for my style, so I decided on quilted panels and calculated how many pinwheels I would need to fill the panels.

I think it took me about 2 evenings of chain piecing, cutting, pressing, and more piecing to assemble all the pinwheel blocks, and then another evening to arrange them into panels. I didn’t get too fussy with the arrangement, I want it to be random but avoid repeats next to one another (there are 4 fabric types and 6 pinwheel combinations).

pinwheel pieces rectangle

Attaching the panels to the (already cut out) Tamarack pieces was still a little nerve wracking since it felt like the point of no return, but I finally did that and am moving ahead with quilting! While sashiko quilting will make the jacket even more eclectic, I’ve decided I’d rather do that than stress about the misalignment misadventures with my novice machine quilting. Sometimes, hand stitching is just so much more soothing.

My partner has been out of town for the week and I’ve been filling my time with late nights of sewing and other creative entropy. It’s been really fun to satisfy my quilting lust and resuscitate this WIP, too. Hopefully, Part IV will be the finished jacket soon!

IMG_0077

Indigo Tamarack: Part I

DSC00456 - croppedIMG_5962

A number of drafted blog posts have fallen by the wayside around here, and I hope to return to them in the early new year, but I’ve found that it’s easiest and most satisfying to post about my active projects, so I’m leaping out of chronology to talk about what’s on my work table now: a Tamarack Jacket.

Tamarack Dreams

I’m a big fan of Grainline Studio, from the pattern designs to Jen’s blog styling. The contemporary aesthetic and thorough instructions have played a huge role in my re-discovery and enjoyment of sewing in the last few years. That said, when Jen started hinting on Instagram that a quilted jacket pattern was in the works, I thought it looked great but was not something I would make — it looked laborious and I wasn’t sure if it fit my style. Yet by the time Grainline Studio released the Tamarack Jacket, temps here in Minnesota had dropped to the mid-40s and I had realized that my outerwear options were severely limited.

On the spectrum of warmth, between my Uptown jacket and a very heavy wool coat (one of my favorite thrifting scores), I was left with a 3/4-sleeves jean jacket and a zip-up fleece jacket I’ve held onto since age 12 and usually reserve for sporty activities. Suddenly, a Tamarack Jacket seemed absolutely essential for my daily life and wardrobe. I bought the pattern immediately.

One of the outcomes of participating in Slow Fashion October has been a growing awareness that I have enough. In fact, I have plenty. I have an abundance of beautiful yarn, fabric, garments to upcycle, dye project materials, etc.  Since time is my limiting factor, I’ve gathered a plentiful stash which I am excited to work with, but very wary of growing.

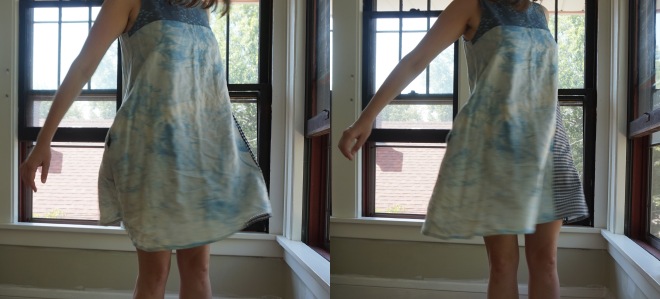
Turning to my stash, I quickly decided that two yards of this Organic, U.S.A. grown and made chambray would be perfect for my Tamarack. Purchased back in the summer with an Archer in mind, the chambray is colorgrown cotton, which is bred to produce natural pigments instead of plain white boules. The green color is very faint, with a silvery tone to it,  and while it’s really lovely, it unfortunately looked terrible on my skin tone.

Indigo to the Rescue

Last year, my wonderfully thoughtful partner, Jenn, gifted me an indigo shibori kit from Botanical Colors. For nearly a year I have treasured this kit — so much so that no project seemed worthy of its use. With the end of fall fast approaching, I seized the opportunity to finally make the indigo vat, with visions of a rich blue Tamarack dancing in my head.

The kit includes everything needed to create an organic indigo vat, or fruit vat, as designed by French chemist Michel Garcia. I followed the instructions provided by the kit, and cross-referenced The Modern Natural Dyer and this guide from Maiwa.

Though I’ve dyed with indigo before, I had never created my own vat, and I have to say it’s truly a magical process. If you’re not familiar, natural indigo requires a reduction process to make the dye available to fibers, meaning you have to remove the oxygen from the vat. Though blue on the surface, a reduced indigo vat is yellow-green, and fabric pulled from the vat is green at first, then turns blue as it is exposed to oxygen. An organic vat can be made in several ways (see the Maiwa guide for more), but the fruit vat uses fructose to reduce the indigo, and slaked lime (calcium hydroxide) to raise the pH (i.e. make it basic).

I decided to dye on an unseasonably warm weekend, knowing it would be one my last chances to be outside in 60 degree weather for many months. I prepared the mother in a large glass jar (above photos), let it rest and reduce, then created the vat in a 5 gallon bucket. Outside, I set up a clothesline and brought out 2 extra buckets filled with some water for oxidizing and rinsing the fabric.

DSC00457

While planning out the project, I was concerned that the kit would not be strong enough to get at least a medium shade of blue on all the fabric for my Tamarack. My 2 yards of colorgrown cotton were not quite enough to supply all the lining and exterior pieces, so I decided to use the largest scraps of similar-weight cotton from my stash for the remaining lining pieces. I didn’t want the jacket to look too hodge-podge, but I figured the indigo would be the great equalizer. So, after printing and assembling the pattern, I cut 2 of each piece from the various fabrics (back, fronts, sleeves, pocket).

All sources I’ve read say that you’ll get the strongest blues at the beginning of using your vat, so I started dyeing with my Tamarack Jacket pieces first to ensure a relative even color. I submerged each piece in the indigo for 4 minutes, moving the fabric through the vat gently to get an even color without adding oxygen to the vat. I hung each piece on the clothesline to oxidize (see below), and continued for additional dips to build the color gradually. Ultimately, I did two dips for the lining pieces and three dips for the exterior of the jacket. Once I felt satisfied with the shade of the Tamarack pieces, I continued dyeing other scraps and yardage from my stash; at the top of the post you can see the “before and after” piles and colors of fabric. After several hours playing the my indigo vat, the sun had set and I could tell the vat needed to be recalibrated (it had lost the bloom and coppery sheen on top, was cool in temperature, and producing very light colors).

DSC00469

Here are some of my indigo dyeing takeaways:

  1. Indigo is very temperature sensitive, and I found that the indigo mother reduced very slowly until I put it in a hot water bath and closely monitored the temperature. Once the temperature was steadily kept between 110 and 120 degrees (F), the indigo sedimentation fell steadily to the bottom of the jar and the navy blue bloom with coppery scum grew at the mouth. This is what you need to look for to know that the mother is ready.
  2. You probably don’t need to use the whole kit in one go. The kit says it contains enough indigo to dye 6 T-shirts to a medium shade. It doesn’t provide the weight of 6 T-shirts but I figured between the Tamarack pieces and other items I wanted to dye in my stash, I would exhaust the whole kit. In hindsight, I would recommend starting with half the ingredients in the kit, that way you have some fructose and lime leftover to help recalibrate the vat, and some additional indigo to create a new mother and reinvigorate it.
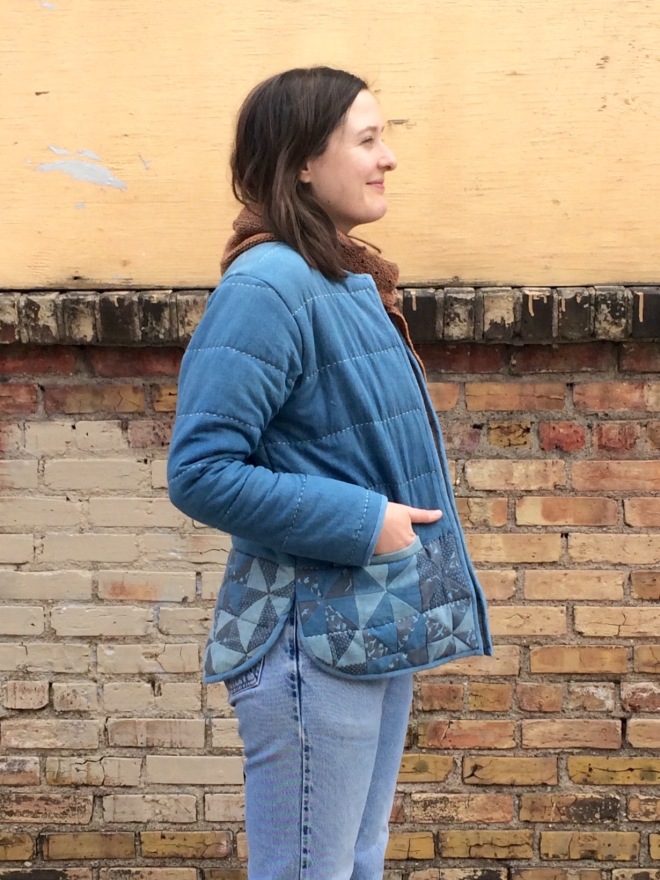
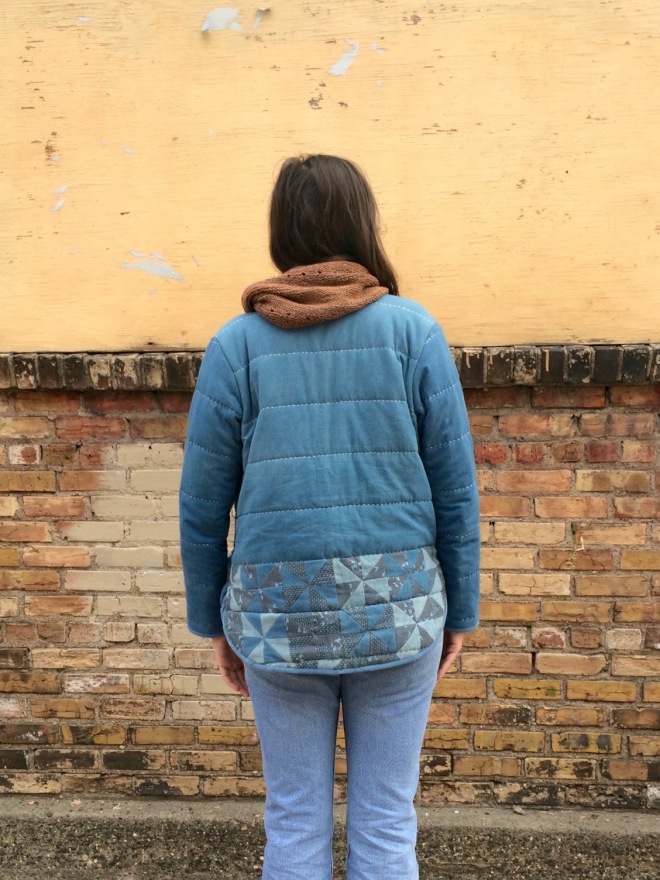
  3. You can reuse an organic indigo vat! The instructions from Botanical Colors don’t seem to mention this, but both the Modern Natural Dyer and Maiwa suggest that the vat can be saved and brought back to life. After drying all of my dyed pieces, I realized that the front pieces of the Tamarack pattern had a streaky effect where the dye washed out unevenly. I was disappointed, but then realized I could bring the vat back to strength and overdye them to hide the mistake. I followed the helpful guidance from Catherine Ellis’ blog and simply added fructose and made sure that my vat stayed between 110 and 120 (on the stovetop). It smelled like maple syrup and though the vat didn’t last as long, I concealed the streaks with 2 more dips per piece of the jacket.

I’m quite excited to begin quilting my Tamarack Jacket, though I’m nervous because I’ve never really quilted anything. I’m also a little nervous that repeated dyeing and washing may have shrunk my pieces or caused too much fraying in the seam allowance. What if I make the whole jacket up and it’s too small? It may have been wiser to dye the fabric instead of the pre-cut pieces. But I’m forging ahead with test quilting and basting my “quilt sandwich.” On my next post, I’ll write about my thought process and research into sourcing quilt batting.
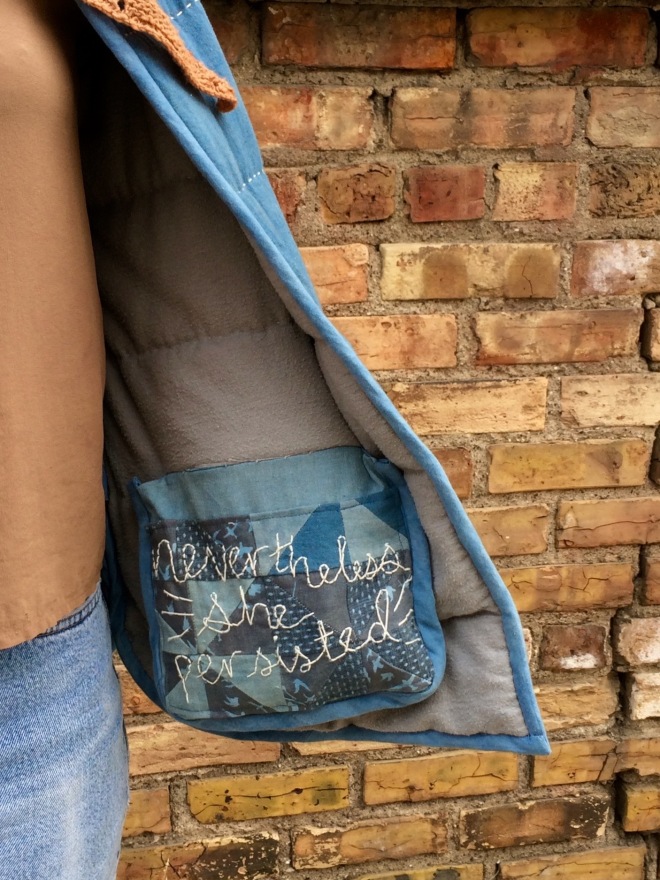
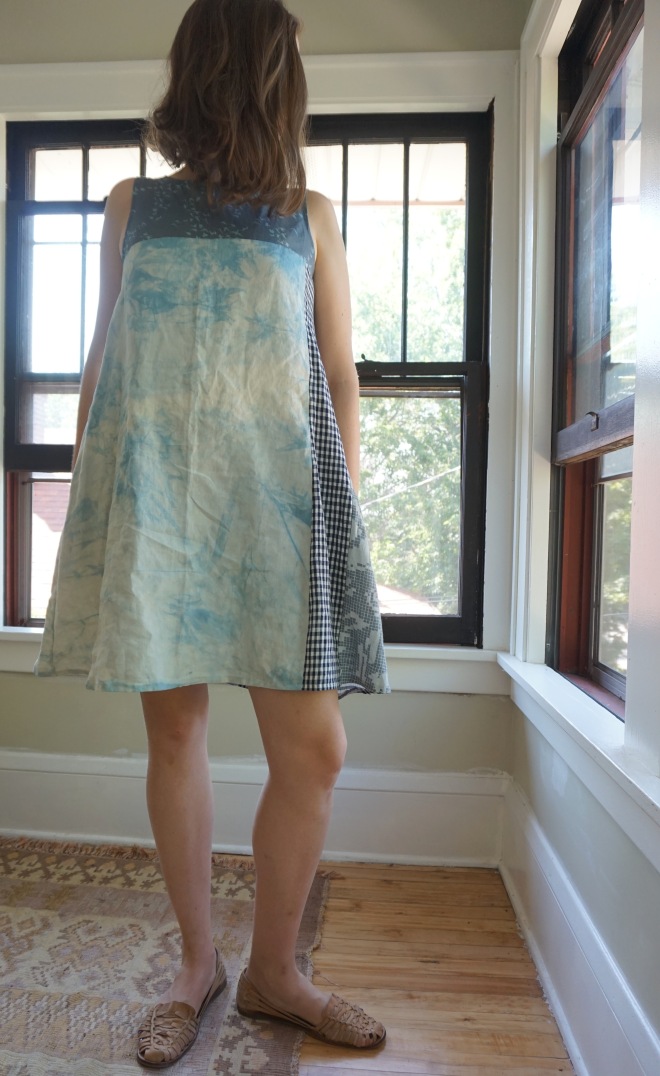
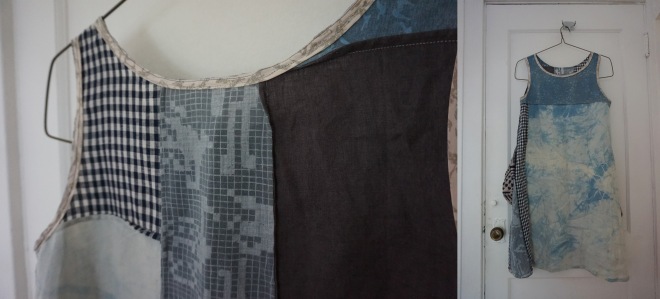
DSC00493